
How To: Connecting Linux devices to OpenVPN Access Server via CLI and APT in Ubuntu / Debian
How To: Connecting Linux devices to OpenVPN Access Server via CLI and APT in Ubuntu / Debian
We have an OpenVPN Server solution for many OS. In this guide, we will show you how to connect your Linux laptop, PCs, severs and even one of our VPS plans to your new OpenVPN Access server.
All commands here are executed in the CLI by the root user.
Step 1: Downloading the official OpenVPN Connect client in Linux Ubuntu/Debian
Firstly we need to ensure that the package manager supports HTTPS transport:
# apt install apt-transport-https
Then we need to add the OpenVPN Repository, Here we are using the repository for Ubuntu 22.04, however you can change “Jammy” to your distro’s release name:
for Ubuntu 21.10 - impish
for Ubuntu 20.04 - focal
for Ubunru 18.04 - bionic
# curl -fsSL https://swupdate.openvpn.net/repos/openvpn-repo-pkg-key.pub | gpg --dearmor > /etc/apt/trusted.gpg.d/openvpn-repo-pkg-keyring.gpg
# curl -fsSL https://swupdate.openvpn.net/community/openvpn3/repos/openvpn3-jammy.list >/etc/apt/sources.list.d/openvpn3.list
# apt update
Now install the newest official OpenVPN connect client:
# apt install openvpn3
Step 2: Going to your OpenVPN Access Server
After everything is installed, go to https://<your OpenVPN Access Server IP>. It will display a self-signed certificate warning. Your server generates a self-signed certificate specially for itself. Just tap on “Advanced…” and then on “Accept the Risk and Continue” to access your OpenVPN server.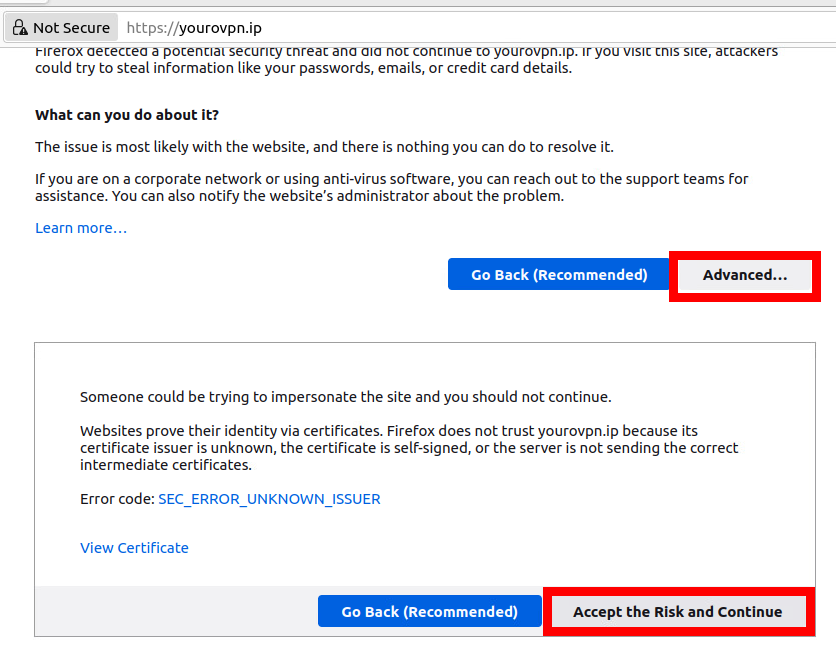
Step 3: Entering Credentials
Then enter your credentials. For a new OpenVPN Access server, the username is “openvpn” as shown below and the password is your VPS root password. You can find them in the E-mail you received from us.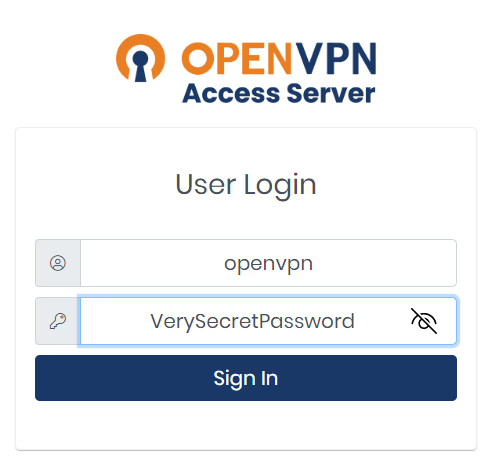
Step 4: Downloading The Profile
You will be presented with clients for most OS. Since you’ve already downloaded the OpenVPN Connect Client you will need to download only the profile. Scroll a bit and tap on “Yourself (user-locked profile)”.
Step 5: Transferring the profile to the Linux Device (Optional)
If you use a linux device, without a desktop environment(e.g. one of our VPS plans), you can send your file via the SCP command, it is supported for most OS through the CLI. Use this command:
> scp <path to your ovpn config> <user>@<yourVPSIP>:</destination/to/file>
e.g. scp C:\Users\Admin\Downloads\profile.ovpn root@yourVPSIP:/home
Step 6: Locating your file (Optional)
To make commands shorter and easier to enter, either open a terminal from the folder or use CD to go to the directory with your .ovpn configuration.
Step 7: Importing the OpenVPN profile
Use this command to import the profile to the OpenVPN Connect Client:
# openvpn3 config-import –config yourprofile.ovpn
Step 7: Establishing the connection
To establish a connection to your BGOcloud OpenVPN server, use this command:
# openvpn3 session-start –config yourprofile.ovpn
Then enter your username and password and wait. After it returns “Connected” then you have made a successful connection to your BGOcloud OpenVPN server. You can check the connection status in the OpenVPN Access Server Admin panel under Status>Users or use an IP checking tool.
To stop the connection, use this command:
# openvpn3 session-manage --disconnect –config yourprofile.ovpn
Basic Troubleshooting:
Error: More than one configuration profile was found with the given name
You have imported your profile twice and the client doesn't know which profile to choose. You need to remove the duplicate configuration. First we will check all profiles using:
# openvpn3 config-manage
Then enter this command and paste the path of the duplicate profile. The path starts with /net/…:
# openvpn3 config-remove -–path <pasted path>
Then try to connect once again.
Error: Failed to start new session: Failed calling D-Bus method Ready: GDBus.Error:net.openvpn.v3.sessions.error: Backend VPN process has died. Session is no longer valid.
This is a known bug in the newest version of openvpn3 for Ubuntu 20.04. Downgrade the version or use the legacy openvpn client and try again.
If you have multiple devices or use different Operating Systems, you can read the rest of our guides here:
Connecting Windows PC to OpenVPN Access Server
Connecting macOS devices to OpenVPN Access Server
Connecting Android phones to OpenVPN Access Server
Connecting iPhone to OpenVPN Access Server
Take a look at our fast and secure OpenVPN Hosting and choose the appropriate plan for your needs.