
MikroTik CHR: How to set up OpenVPN server for your IoT devices (+ video)
This guide walks you through setting up a fully working OpenVPN server on a MikroTik Cloud Hosted Router — step by step, nothing skipped. Whether you're running RouterOS v6 or v7, you can follow along using WinBox, Webfig, or the MikroTik mobile app on Android or iOS. Throughout this tutorial we'll use 192.168.34.0/24 as our OpenVPN network range.
Here's a short video overview of the whole process before we dive in:
Table of Contents
- Enable NTP on the CHR (important)
- Update RouterOS to the latest stable version
- Create a bridge interface for the OpenVPN network
- Assign an IP address to the VPN bridge
- Create an IP pool for OpenVPN clients
- Add a firewall rule to allow OpenVPN traffic
- Enable NAT masquerading for internet access
- Create and sign the TLS certificates
- Enable the OpenVPN server
- Configure the default-encryption PPP profile
- Create a PPP user account
OpenVPN authenticates connections using TLS certificates, and TLS certificates have validity windows defined by dates. If your CHR's clock is wrong — even by a few hours in the wrong direction — those certificates will look expired or not-yet-valid, and every connection attempt will fail. Get this right before anything else.
In WinBox, go to System > NTP Client, enable it, and add your NTP servers. We're using 0.pool.ntp.org and 1.pool.ntp.org — free, reliable public servers that work globally.
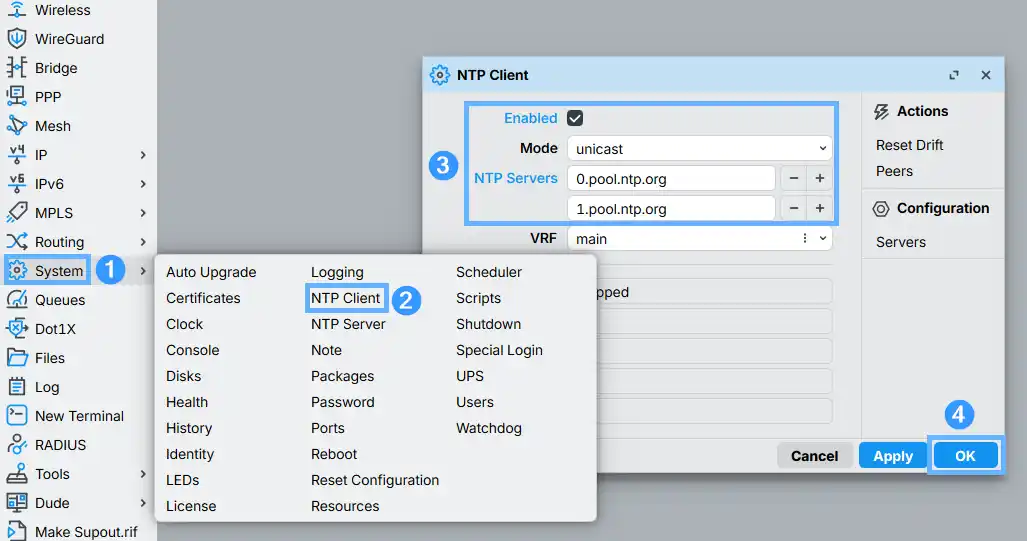
system ntp client servers add address=1.pool.ntp.org
system ntp client set enabled=yes
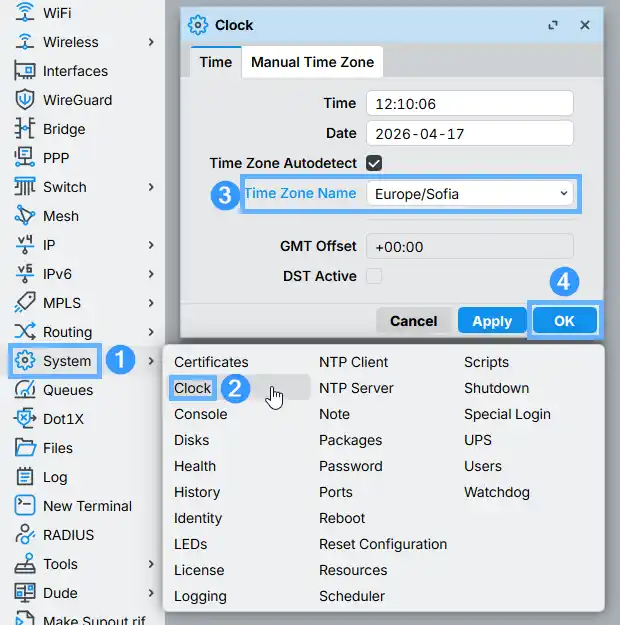
While you're in this area, set the correct timezone too. Go to System > Clock and pick your region from the dropdown. MikroTik uses the standard Linux timezone identifiers, so the format is things like Europe/Sofia, US/Central, or just UTC.
If your CHR is already on a recent build, skip this. If not, it's worth a few minutes — MikroTik has made significant OpenVPN improvements with nearly every major release:
- v7.1: UDP transport support for OpenVPN tunnels; modern encryption algorithms added
- v7.2: Hardware acceleration for AES traffic over OpenVPN
- v7.3: IPv6 support in OpenVPN tunnels
- v7.9: One-click
.ovpnprofile export for easy client sharing - v7.12: TLS-AUTH support
- v7.17: Multiple concurrent OpenVPN server instances via the new OVPN Servers tab; additional cipher options
In WinBox, go to System > Packages and click Check for Updates. If a newer version shows up, click Download and Install — the router will reboot automatically to apply it.
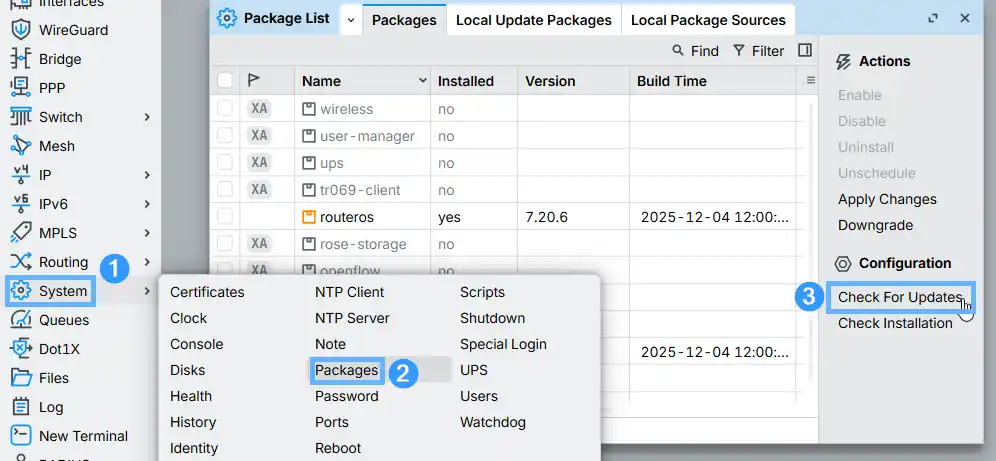
system package update download
system reboot
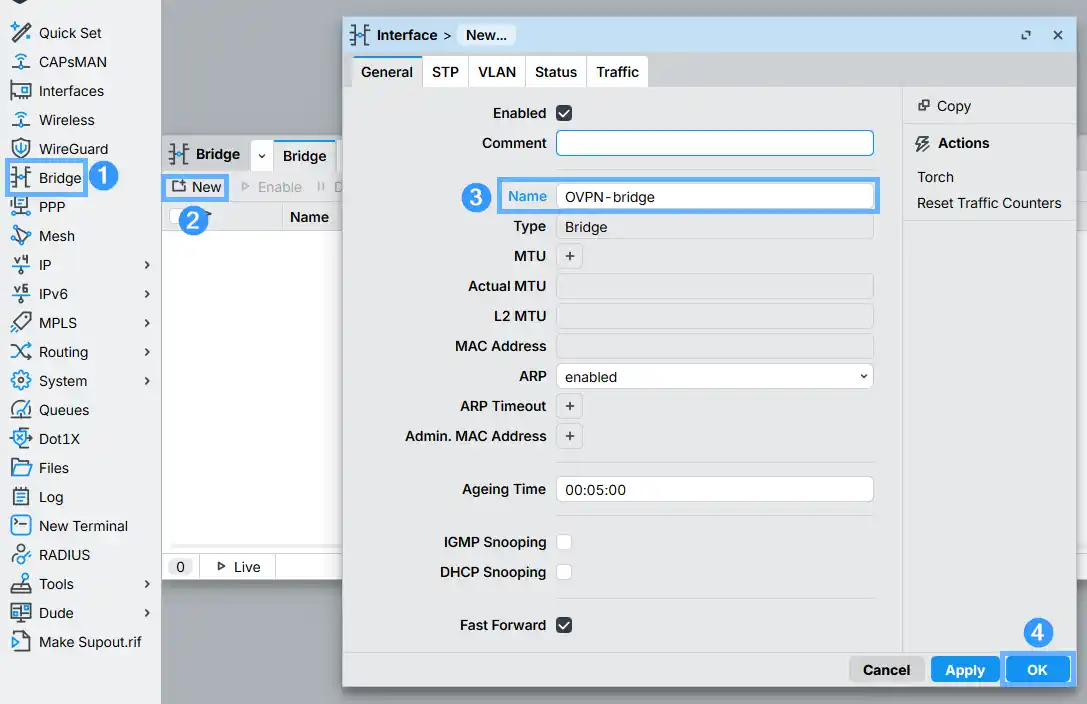
Open Bridge in the sidebar and click New. Give it a clear name — OVPN-bridge works well. You can also create it from Interfaces > + > Bridge if you prefer working from there.
Go to IP > Addresses and click New. Set the address to 192.168.34.1/24 and assign it to the OVPN-bridge interface you just created. This becomes the gateway address for all VPN clients.

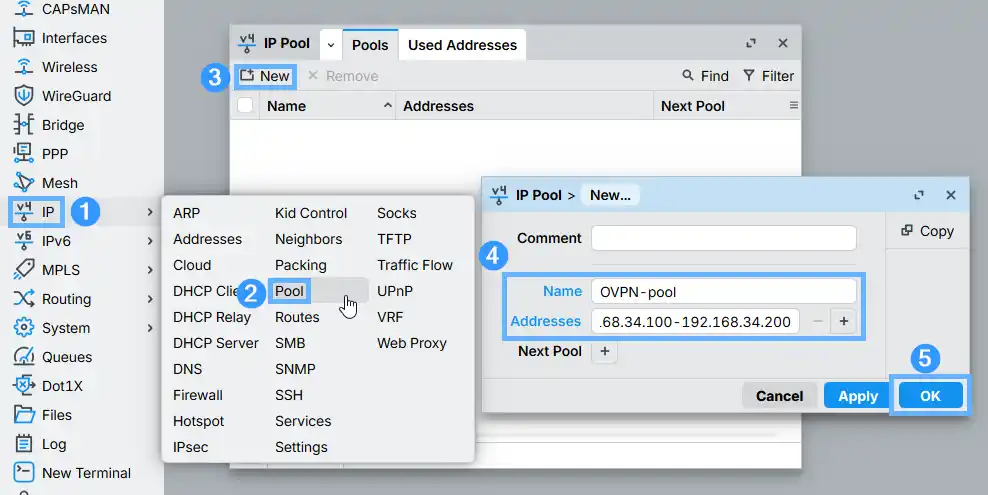
Go to IP > Pools and click New. Name it OVPN-pool and set the range to 192.168.34.100–192.168.34.200. That's room for up to 100 simultaneous VPN clients — more than enough for most setups.
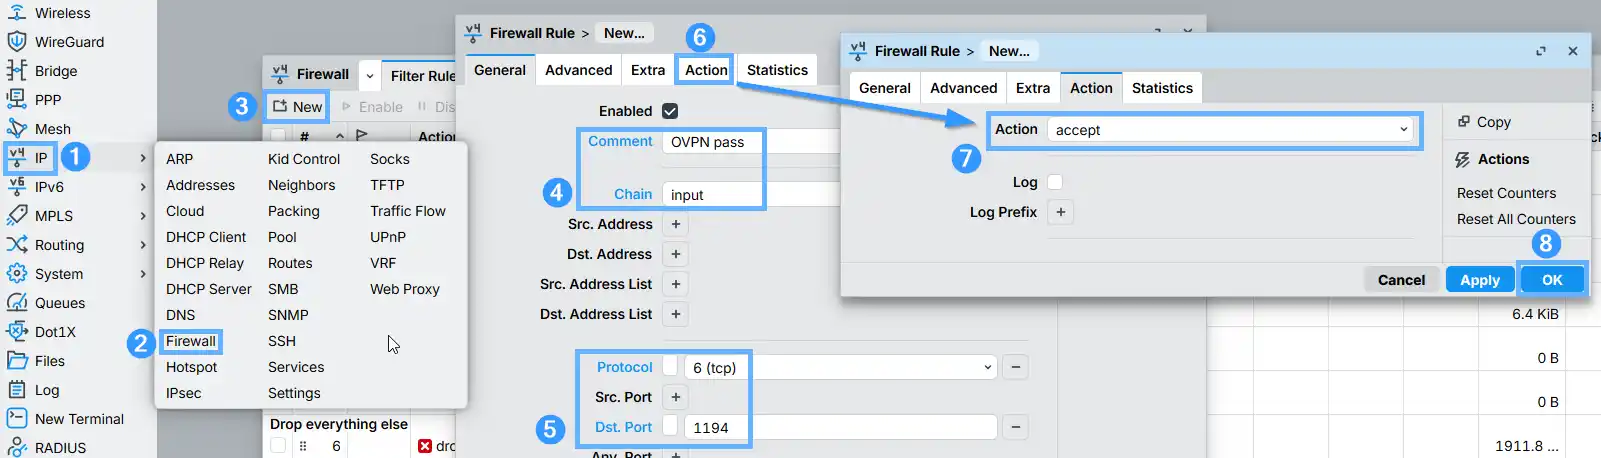
If your CHR has a restrictive firewall — like the setup described in our basic CHR security guide — you need an explicit accept rule for OpenVPN traffic. Without it, inbound VPN connections will be silently dropped.
Go to IP > Firewall and create a new filter rule with these settings:
- Chain: input
- Protocol: TCP (switch to UDP if you plan to run OpenVPN in UDP mode)
- Dst. Port: 1194
- Action: accept
- Comment: OVPN pass
Once saved, drag the rule above any drop/reject rules in the list so it's evaluated first:
CLI users: print the existing rules first, identify where the drop rules start, then use place-before to insert above them:
--- Firewall rules output ---
ip firewall filter add chain=input comment="OVPN pass" dst-port=1194 protocol=tcp place-before=X
Replace X with the rule number of the first drop rule from the print output.
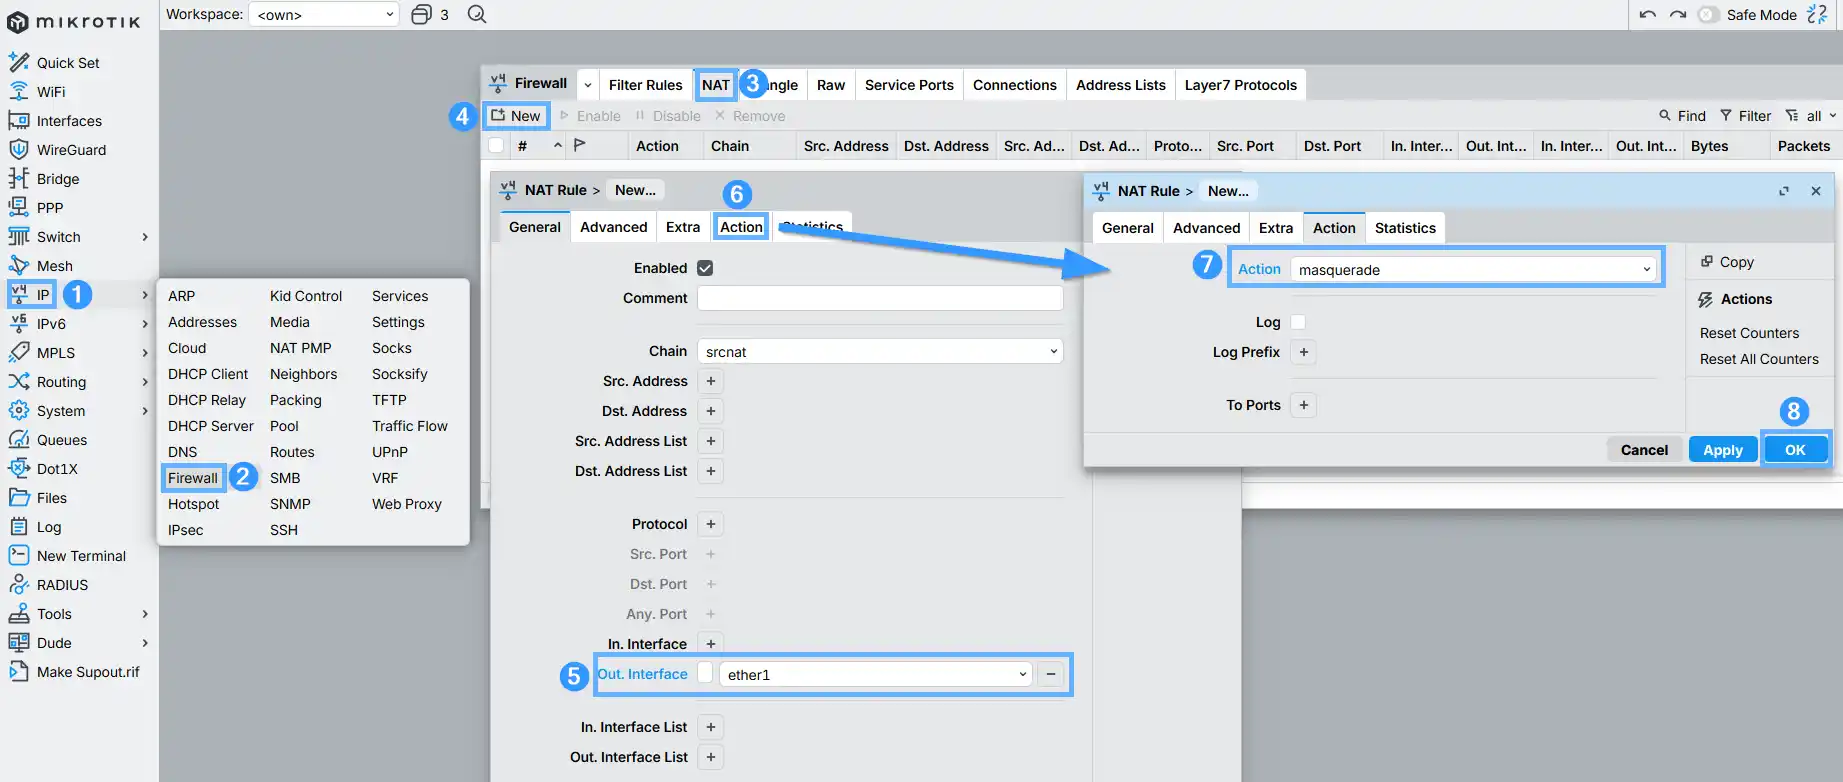
Without a masquerade NAT rule, VPN clients can only communicate with each other and with the CHR itself — they won't have outbound internet access. Go to IP > Firewall > NAT, click New, and create this rule:
- Chain: srcnat
- Out. Interface: ether1 (or whichever interface faces your WAN)
- Action: masquerade
This is the step that trips people up most often, but MikroTik actually makes it quite painless. You'll create your own Certificate Authority directly on the CHR and use it to sign both the server and client certificates — no external tools, no separate CA server needed.
One of the underrated advantages of running OpenVPN on a MikroTik CHR is that you get a fully functional built-in CA. The same CA can issue certificates for SSTP VPN, other CHR instances, or really any other PKI purpose on your network.
Go to System > Certificates and click New to get started.

8a. Create and sign the Certificate Authority (CA)
Fill in the new certificate form as follows:
- Name: LMTCA
- Country, State, Locality, Organization, Unit: your own details
- Common Name: LMTCA
- Key Size: 4096
- Days Valid: 3650 (drop to 365 for tighter security, at the cost of annual renewals)
Switch to the Key Usage tab and check only crl sign and key cert sign.
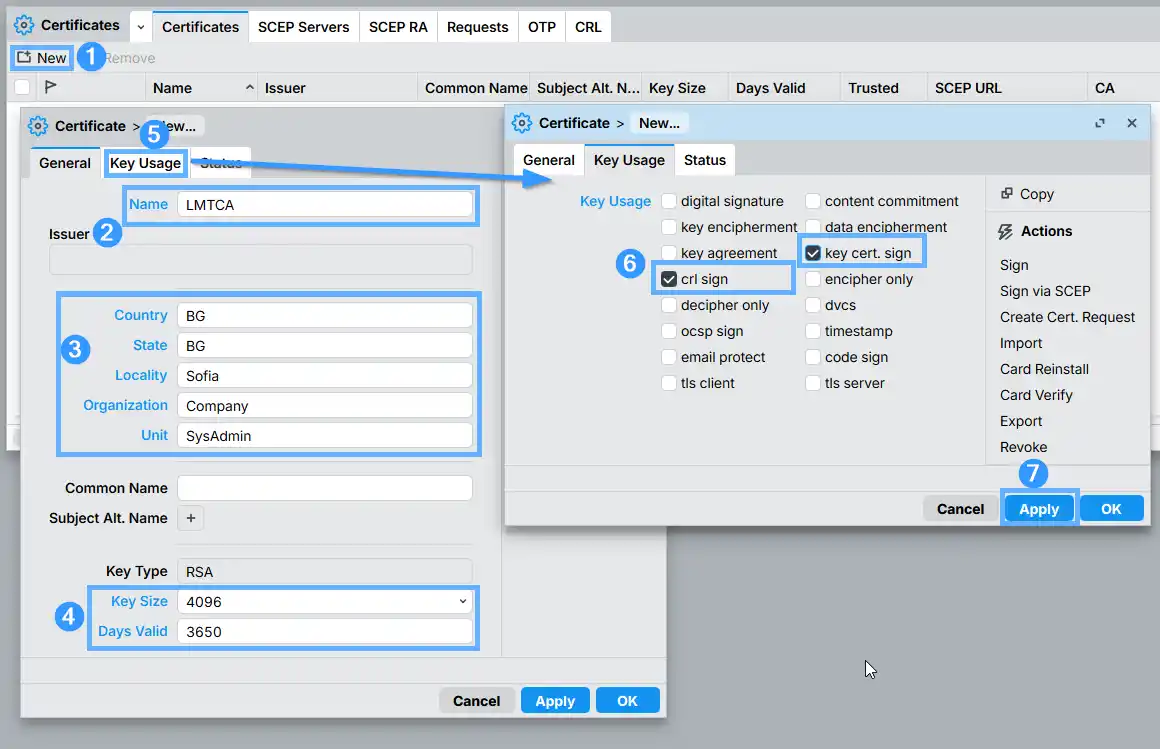
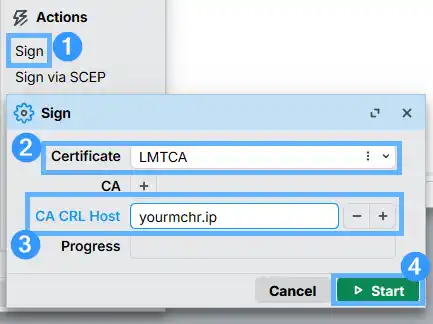
Click Apply, then click Sign. In the signing dialog, optionally set the CRL Host to your CHR's public IP in the format http://XX.XX.XX.XX. This isn't required for basic use, but it enables proper certificate revocation if you ever use this CA across multiple MikroTik devices.
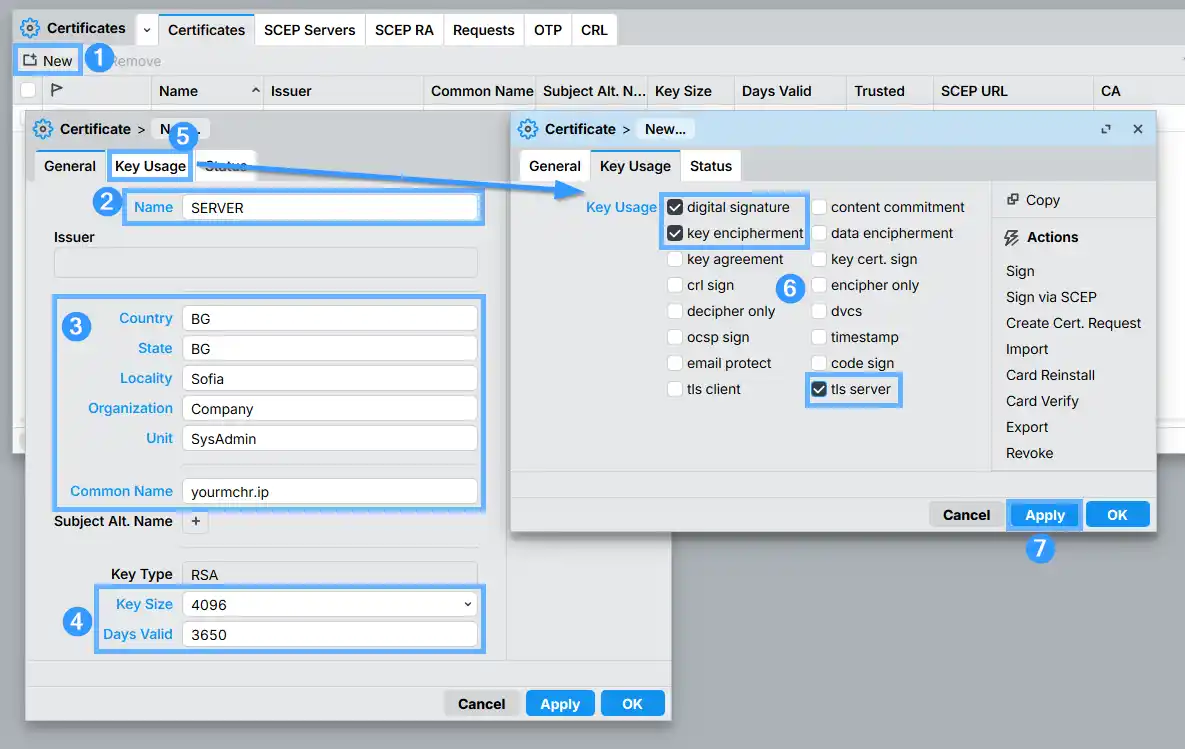
8b. Create and sign the OpenVPN server certificate
Create a second certificate with these settings:
- Name: SERVER
- Common Name: your CHR's public IP address
- Key Size: 4096
- Days Valid: 3650
On the Key Usage tab, check only digital signature, key encipherment, and tls server.
Click Apply, then sign it with the LMTCA authority you just created:
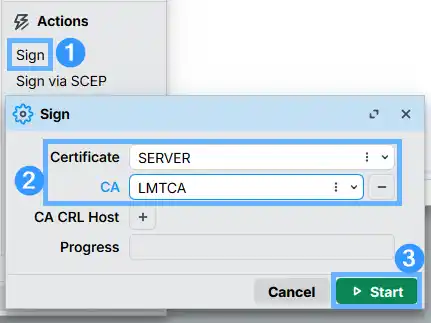
After signing, open the certificate again and tick the Trusted checkbox on the General tab:
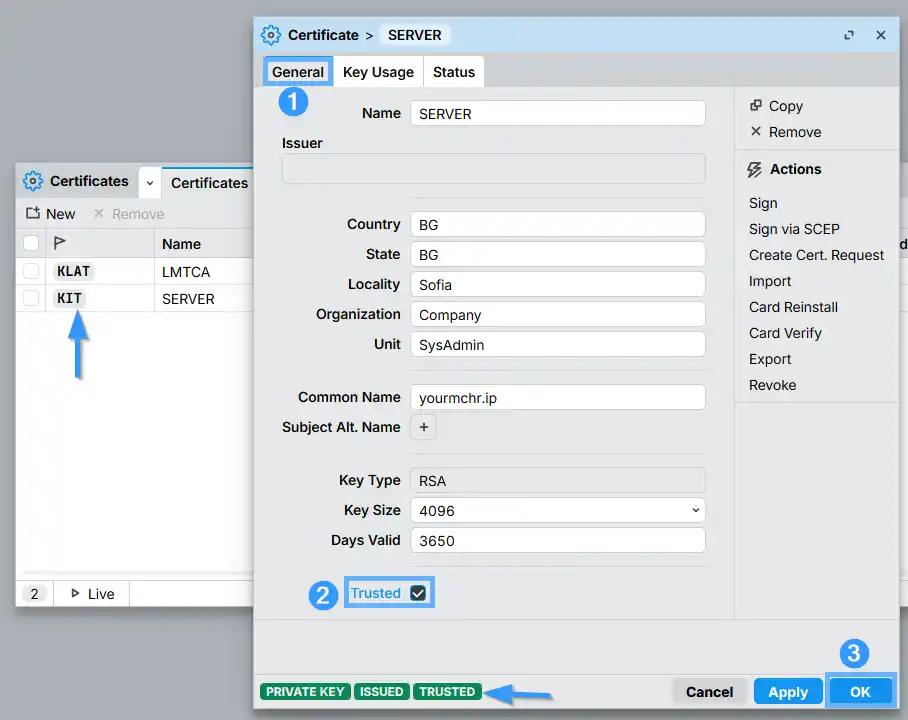
certificate set SERVER trusted=yes
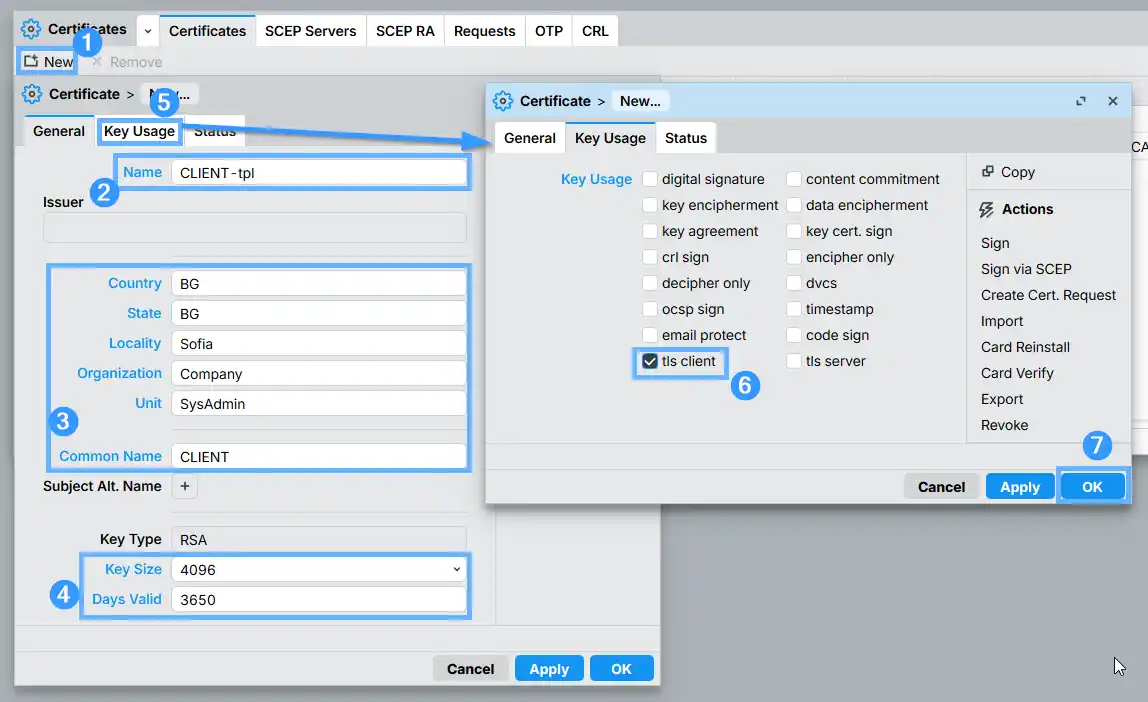
8c. Create a client certificate template and issue client certs (optional but strongly recommended)
Client certificates add a proper second authentication factor on top of username/password. When you enable Require Client Certificate on the OpenVPN server, anyone connecting without a valid, CA-signed certificate gets rejected before they even reach the login prompt.
Start with a template to make future certificate generation faster:
- Name: CLIENT-tpl
- Common Name: CLIENT
- Key Size: 4096
- Days Valid: 3650
On the Key Usage tab, check only tls client.
To create a client certificate, double-click the template and copy it. Change the name and common name to something like CLIENT1, CLIENT2, etc., then sign it with the CA. Give each device or user a dedicated certificate — that way, revoking access for one client doesn't affect anyone else.
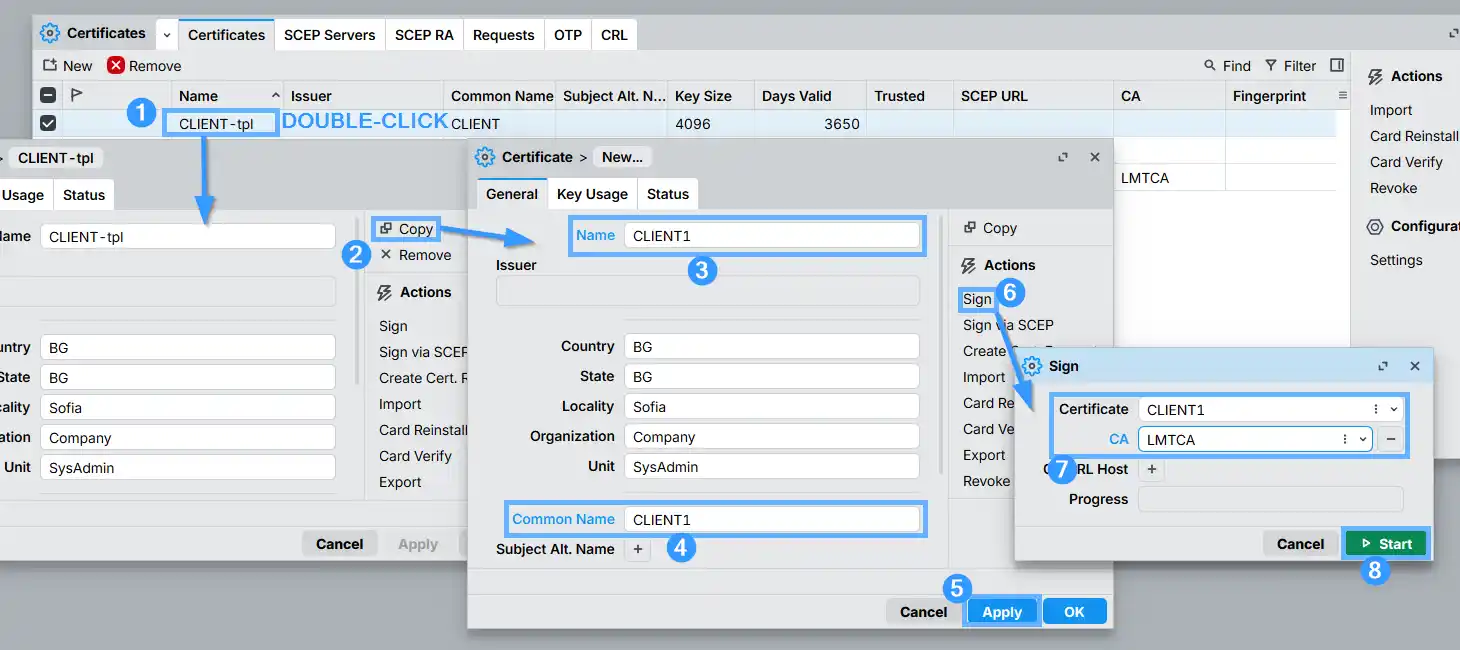
certificate sign CLIENT1 ca="LMTCA"
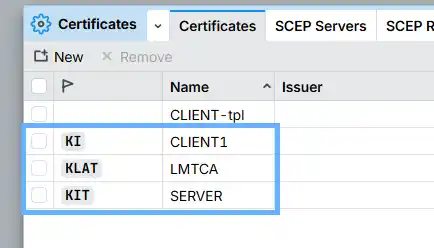
When everything is correctly signed and trusted, the certificates in the list should show the following flags:
- K, L, A, T — Certificate Authority (LMTCA)
- K, I, T — Server certificate (SERVER)
- K, I — Client certificates (CLIENT1, CLIENT2, etc.)
8d. Export and download the certificates
Right-click each certificate and choose Export. Give them meaningful file names so you don't mix them up later. When exporting a client certificate, always set a passphrase — the client will need it when importing the cert file on their device.
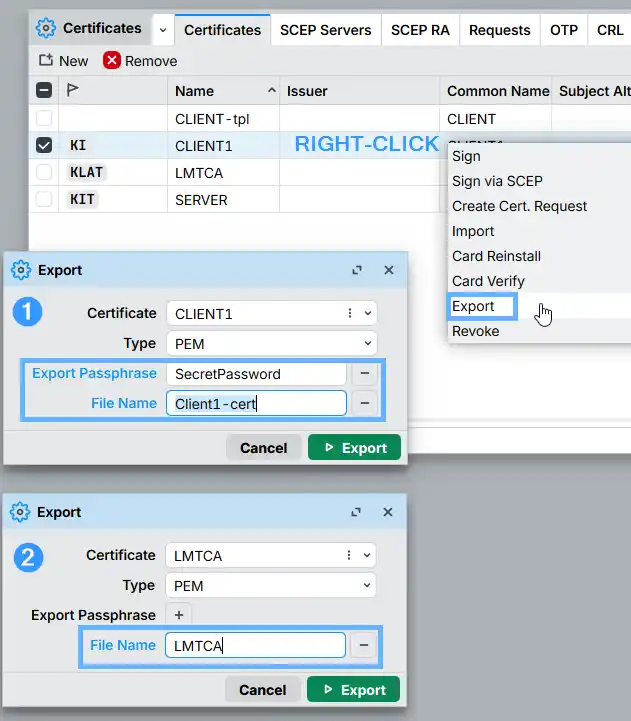
certificate export-certificate CLIENT1 export-passphrase=12345678
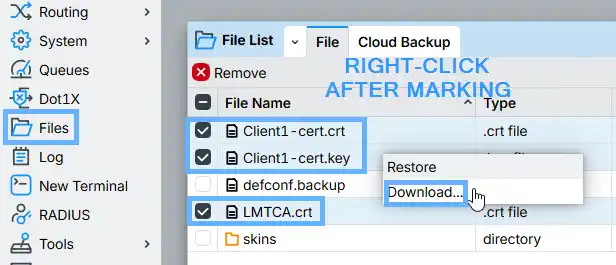
The exported files land in Files on the CHR. Download them from there via WinBox (select all > drag-and-drop to your desktop), or transfer them with SFTP using a tool like WinSCP.
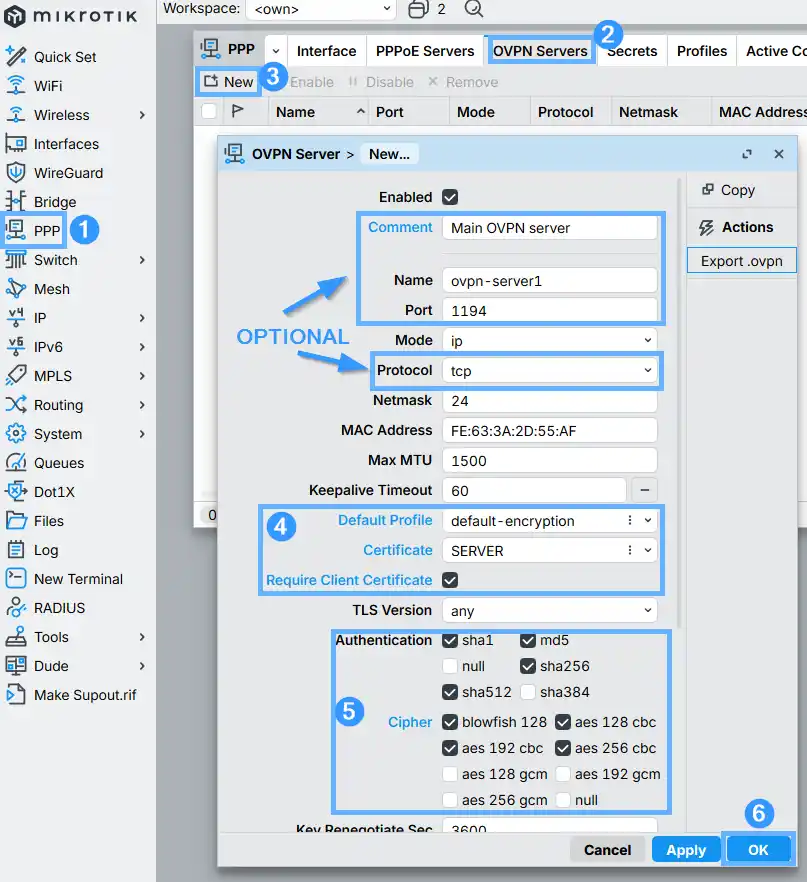
interface ovpn-server server set name="ovpn-server1" <settings> disabled=noIn WinBox, go to PPP > OVPN Servers (RouterOS 7.17+) or click Interface > OVPN Server and check Enabled (older versions). You must set the default-encryption profile, or another profile if you have multiple OVPN servers, and choose the SERVER certificate you have made in step 8b. We highly reccommend you enabling Require Client Certificate for even higher security, as it will block any user without one or with an wrong/revoked one.
After that you can choose any auth/cipher encryptions and port/protocol depending on your environment and needs, If available, you can use the newer and faster AES GCM ciphers.
The following is an example configuration:
- Port: 1194
- Protocol: TCP
- Default Profile: default-encryption
- Certificate: SERVER
- Require Client Certificate: enabled
- Auth: sha1, md5, sha256, sha512
- Cipher: blowfish128, aes128-cbc, aes192-cbc, aes256-cbc
RouterOS 7.17 and newer — new OVPN Servers tab:
RouterOS older than 7.17 — single OVPN Server dialog:
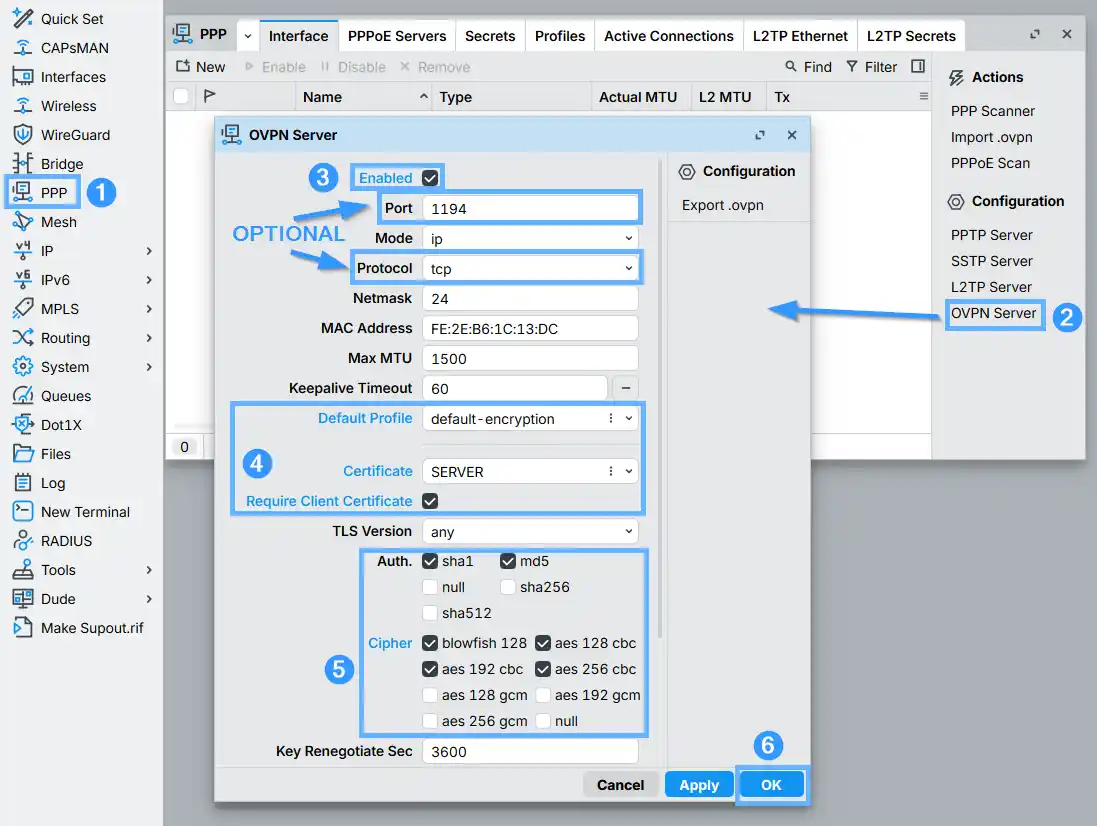
(ROS <7.17) interface ovpn-server server set default-profile=default-encryption certificate=SERVER require-client-certificate=yes auth=sha1,md5 cipher=aes128-cbc,aes192-cbc,aes256-cbc,blowfish128 enabled=yes
(ROS >=7.17) interface ovpn-server server add name="ovpn-server1" default-profile=default-encryption certificate=SERVER require-client-certificate=yes auth=sha1,md5 cipher=aes128-cbc,aes192-cbc,aes256-cbc,blowfish128 disabled=no
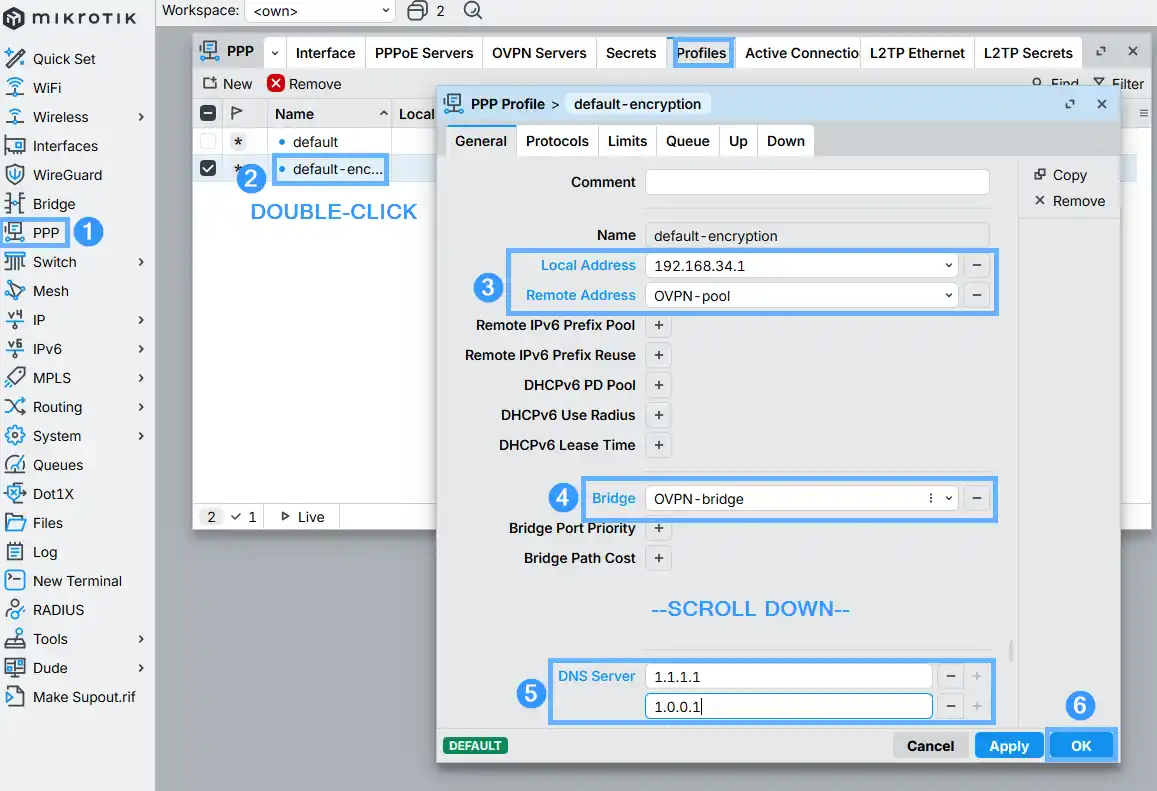
disabled=no, not enabled=yes — the logic is inverted from what you might expect. Set disabled=no to turn it on, disabled=yes to turn it off.Go to PPP > Profiles, double-click default-encryption, and set the following:
- Local Address: 192.168.34.1
- Remote Address: OVPN-pool
- DNS Servers: 1.1.1.1, 1.0.0.1 (Cloudflare — or your preferred servers)
- Bridge: OVPN-bridge
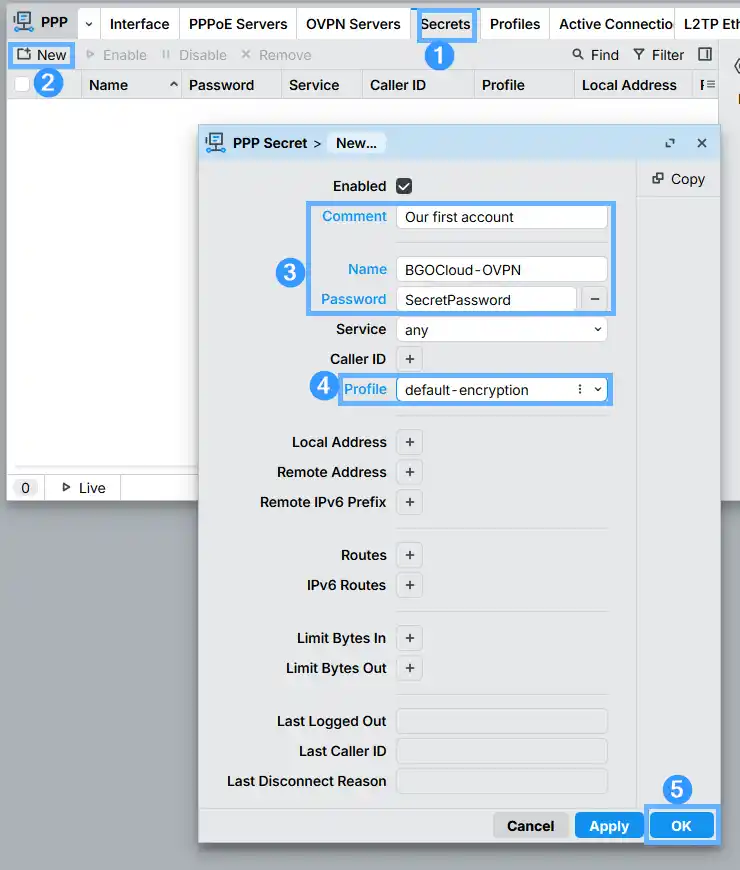
On the Limits tab, you can also toggle Only One to restrict each PPP secret to a single concurrent session — useful if you want to prevent shared credentials from being used from multiple places at once.
Go to PPP > Secrets, click +, and add your first VPN user. Set a username and a strong password, then make sure the profile is assigned to default-encryption.
That's the full setup. Your MikroTik CHR is now running an OpenVPN server and ready to accept connections. Time to connect some clients.
Connect your devices using these guides:
Need a MikroTik CHR to run this on? BGOCloud's MikroTik VPS plans give you full RouterOS access, SSD-backed performance, and unlimited traffic options — deployed in under a minute. Everything in this guide works out of the box on our CHR instances.
If this is more than you want to manage yourself, check out our ready-to-use OpenVPN Hosting plans(upgrade in progress). Or if you're after a faster, more modern VPN protocol, take a look at our guide for setting up WireGuard on MikroTik CHR — it's noticeably quicker than OpenVPN for most use cases and is quicker to set up without the need to create new certificates.