
MikroTik CHR: Setup Secure VPN access between client and server using OpenVPN
In this article, we will show you how to set up secure VPN access to your server using OpenVPN. We have already set up an OpenVPN server in this article
IMPORTANT: The date on the router must be within the range of the installed certificates valid period. To prevent certificate verification issues, enable NTP synchronization on both the server and the client.
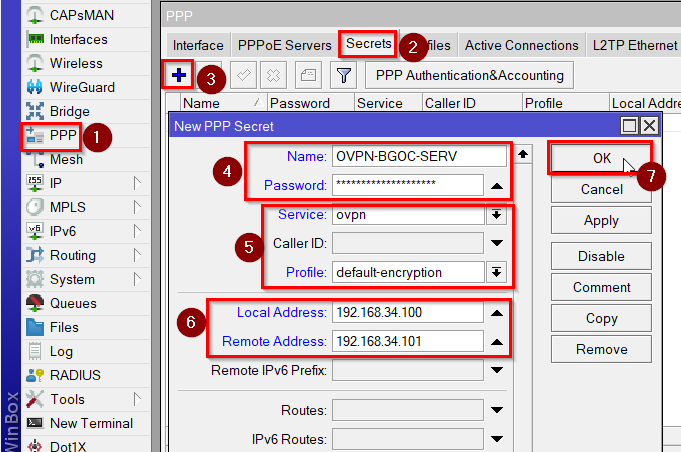
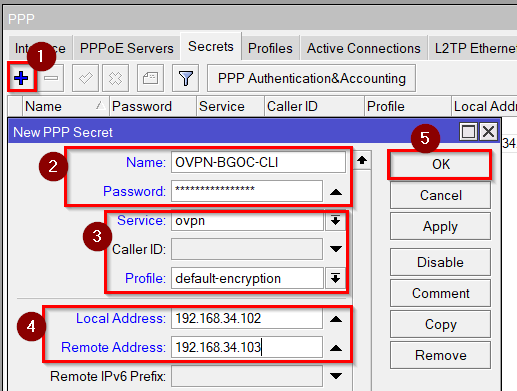
First we need VPN accounts for the server and client. Go to PPP>Secret, click on “+” and enter:
User credentials of your choice
Service: OVPN
Profile: default-encryption
Local IP Address:
192.168.34.100(for the server)
192.168.34.102(for the client)
Remote IP Address:
192.168.34.101(for the server)
192.168.34.103(for the client)
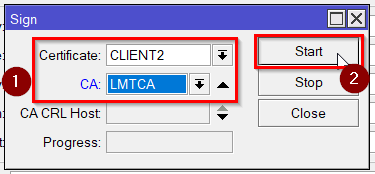
Then go to System>Certificates. Make 2 client certificates(CLIENT2 and CLIENT3) by copying the Client template and sign them with the CA you made.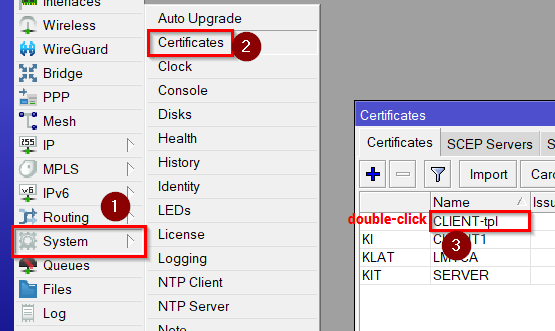

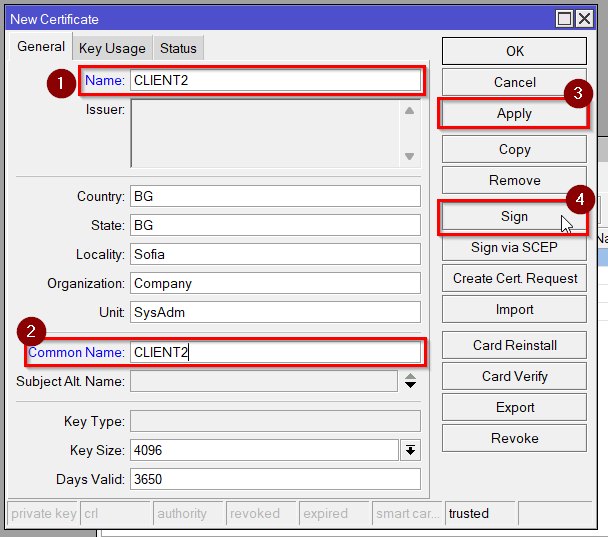
Repeat the steps for the second client certificate
RouterOS Command:
[admin@MikroTik] > /certificate add name=CLIENT2 copy-from="CLIENT-tpl" common-name="CLIENT2"
[admin@MikroTik] > /certificate sign CLIENT2 ca="LMTCA" name="CLIENT2"
[admin@MikroTik] > /certificate add name=CLIENT3 copy-from="CLIENT-tpl" common-name="CLIENT3"
[admin@MikroTik] > /certificate sign CLIENT3 ca="LMTCA" name="CLIENT3"
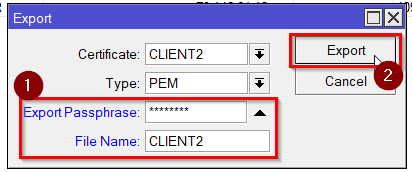
Export both client certificates with a passphrase and the CA certificate without a passphrase.
Repeat the steps for the second client certificate
RouterOS Command:
[admin@MikroTik] > /certificate export-certificate CLIENT2 export-passphrase=12345678
[admin@MikroTik] > /certificate export-certificate CLIENT3 export-passphrase=12345678
[admin@MikroTik] > /certificate export-certificate LMTCA export-passphrase=""
Go to Files and download all the exported certificates by dragging them to a folder.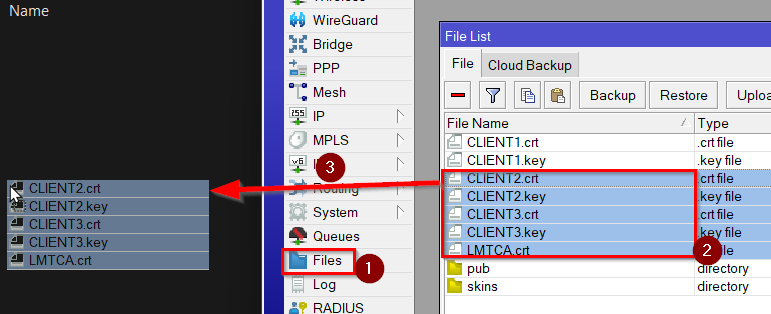
Open your favorite text editor app and paste the example .OVPN configuration. Make configuration and secret files for the server and client.
Example .OVPN configuration file:
client
dev tun
proto tcp-client
remote IP address of your Mikrotik CHR
port 1194
nobind
persist-key
persist-tun
tls-client
remote-cert-tls server
ca LMTCA.crt #CA certificate file
cert CLIENT1.crt #CLIENT certificate file
key CLIENT1.key #CLIENT certificate key
verb 4
mute 10
cipher AES-256-CBC
data-ciphers AES-256-CBC
auth SHA1
auth-user-pass secret #File with user/password for VPN
auth-nocache
;redirect-gateway def1 #remove semicolon for full redirect
Example secret file:
BGOcloud VPN
P@ssworD!#
Put all the files for the server in SERVER\mikrotik folder.
In the end, the files should look like this: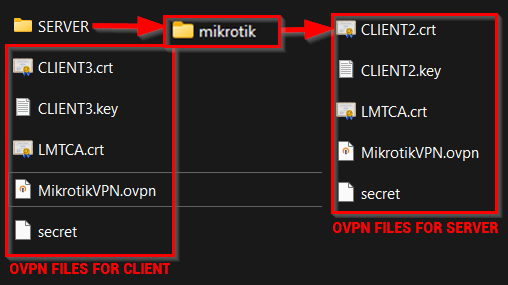
Now we need to set up our Debian VPS
All commands are executed with the root user, you can also use sudo
- Update the system
apt-get update
apt-get upgrade - Install the OpenVPN Client
You can change the “release/2.5” to your needed OpenVPN Version and “buster” to your linux distro.wget -O - https://swupdate.openvpn.net/repos/repo-public.gpg|apt-key add -
echo "deb http://build.openvpn.net/debian/openvpn/release/2.5 buster main" > /etc/apt/sources.list.d/openvpn-aptrepo.list
apt-get update
apt-get install openvpn - On your PC, open the Server folder in a terminal(e.g. Windows Terminal, Powershell).
Windows 10(Shift + Right-click)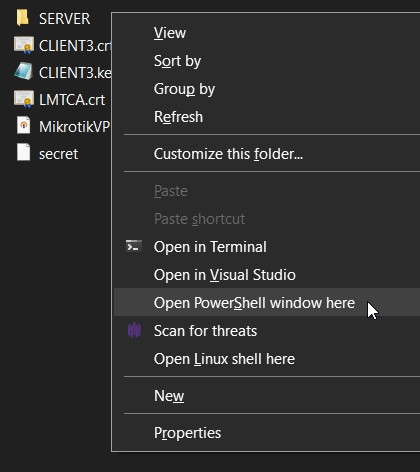
Windows 11(Right-click)
- Send all the files with SCP
with the -r option, it copies the whole file structure within the current directory.SCP -r *.* root@server:/etc/openvpn/client
If this is your first connection through SCP to the server, it will ask you if you want to add it to the Trusted Servers list. Accept it and enter your VPS root password. - On your server, go to /etc/openvpn/client/mikrotik
cd /etc/openvpn/client/mikrotik
- Check /etc/openvpn/client/mikrotik contents. You should have the CA and Client certificates, the key for the client certificate, the .ovpn configuration file, and the secrets file.
- Decrypt the key for automation purposes using OpenSSL:
openssl rsa -in CLIENT2.key -out CLIENT2.key
- Restart the OpenVPN services
service openvpn restart
- Change the file permissions for the key and secrets file.
chmod 400 /etc/openvpn/client/Mikrotik/CLIENT2.key
chmod 400 /etc/openvpn/client/Mikrotik/secret - Test the connection with the OpenVPN server.
The connection may reset 1-2 times. However, if it shows “Connection reset, restarting” many times, or you get a “General transport failure” error, you need to recheck the secrets file and see if the credentials are right. If that doesn’t help, check your OpenVPN server configuration file.openvpn –config MikrotikVPN.ovpn
When it shows Initialization Sequence Completed, then you’ve successfully connected to your OpenVPN. Now we can configure it to connect automatically when the VPS is powered on. - Copy the OpenVPN configuration file to the root directory of OpenVPN
cp MikrotikVPN.ovpn /etc/openvpn
- Open the copied configuration file in a text editor.
nano /etc/openvpn/MikrotikVPN.ovpn
- Append client/mikrotik to your file path for ca, cert, key, and auth-user-pass. Remove the semicolon in redirect-gateway to make your server accessible only from your OpenVPN Server.
client
dev tun
proto tcp-client
remote IP address of your Mikrotik CHR
port 1194
nobind
persist-key
persist-tun
tls-client
remote-cert-tls server
ca client/mikrotik/LMTCA.crt #CA certificate file
cert client/mikrotik/CLIENT1.crt #CLIENT certificate file
key client/mikrotik/CLIENT1.key #CLIENT certificate key
verb 4
mute 10
cipher AES-256-CBC
data-ciphers AES-256-CBC
auth SHA1
auth-user-pass client/mikrotik/secret #File with user/password for VPN
auth-nocache
redirect-gateway def1 #remove semicolon for full redirect - Save the configuration file and rename it to client.conf
mv MikrotikVPN.ovpn client.conf
- Open the /etc/default/OpenVPN file in a text editor
nano /etc/default/openvpn
- Remove the # in line AUTOSTART="all" save it
- Enable the OpenVPN service, reload the daemons and start the service.
systemctl enable [email protected]
systemctl daemon-reload
systemctl start [email protected]
If you need to stop OpenVPN, use service openvpn stop or systemctl stop [email protected]
And that’s it. You should now access your server only when you are connected to the VPN.
Check our powerful Mikrotik Cloud Hosted routers