
MikroTik CHR How to set-up L2TP VPN Server. VPN server for Apple devices - Iphone, MacBook. (+ video)
L2TP/IPsec is one of the best-supported VPN protocols for Apple devices — it works natively on iPhone, iPad, and macOS without needing to install a third-party client. This guide walks you through setting up an L2TP/IPsec VPN server on a MikroTik Cloud Hosted Router (CHR) or any physical RouterOS device, covering both WebFig/WinBox and the RouterOS CLI.
Here's a short video walkthrough of the whole process:
The diagram below gives an overview of the network we're building — a MikroTik router with a public IP acting as the VPN gateway, with L2TP clients tunnelling into the private 10.1.101.0/24 network:
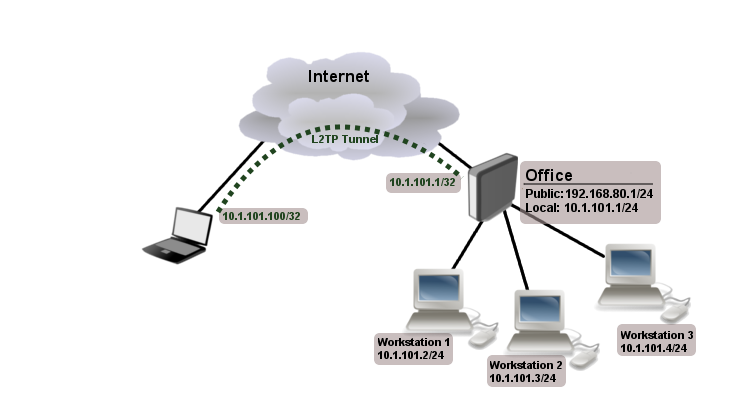
Table of Contents
- Create a bridge interface for the L2TP network
- Assign an IP address to the bridge
- Create an IP pool for VPN clients
- Enable the L2TP server with IPsec
- Edit the default-encryption PPP profile
- (Optional) Use the CHR as a DNS server for VPN clients
- Create a VPN user account (PPP Secret)
- Enable NAT masquerading for internet access
- Allow L2TP/IPsec traffic through the firewall
- (Optional) Create L2TP server interface bindings
We start by creating a dedicated bridge interface that will serve as the local network gateway for L2TP clients. If you already have a bridge and a private IP subnet on your router, you can skip ahead to Step 3 — there's no need to create a second one.
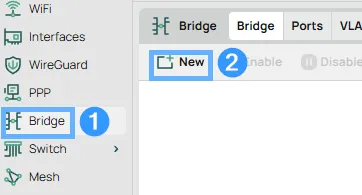
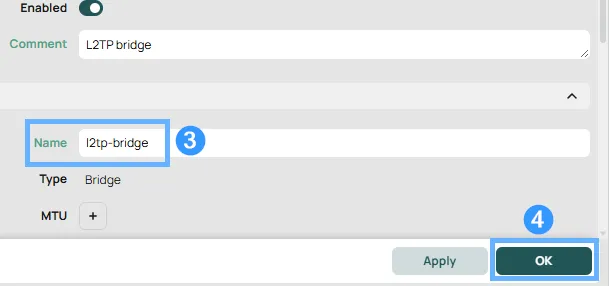
In WinBox or WebFig, go to Bridge, click New, and name it l2tp-bridge:
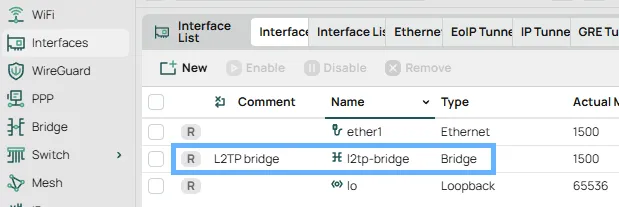
Once created, the new bridge appears in the Interfaces list:
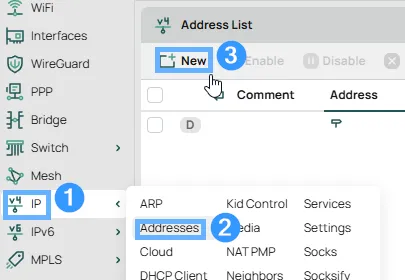
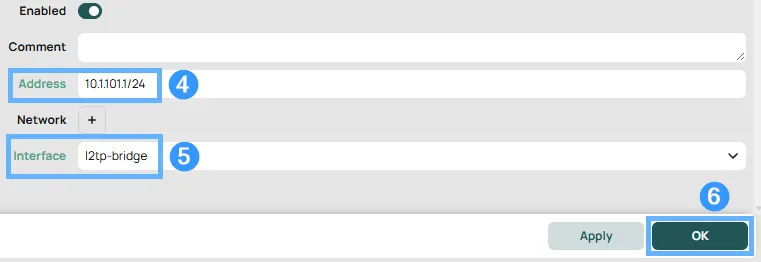
The bridge needs an IP address — this becomes the local gateway that VPN clients will route through. Go to IP > Addresses, click New, enter 10.1.101.1/24 as the address, and assign it to the l2tp-bridge interface. If your existing network already uses a different subnet, use that instead — just update the IP pool range in the next step to match.
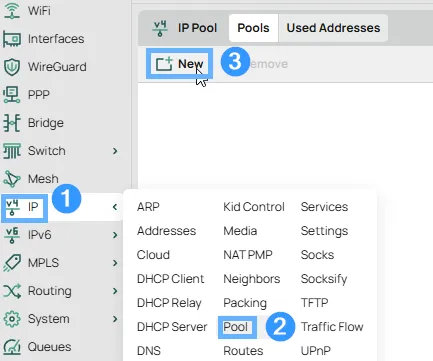
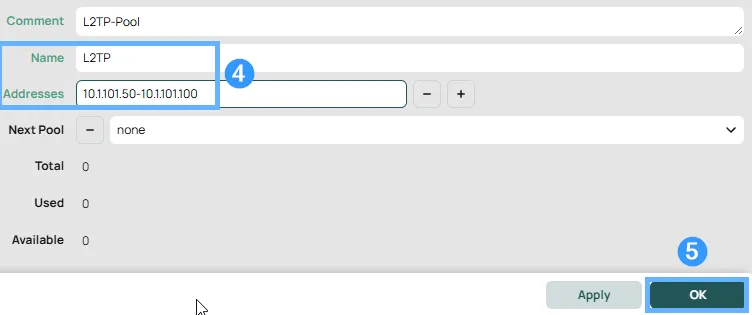
The IP pool determines which addresses get handed out to connecting L2TP clients. We'll keep it within the same subnet as the bridge — 10.1.101.50–10.1.101.100 gives us room for 51 concurrent VPN sessions, which is plenty for most use cases.
Go to IP > Pool, click New, name it L2TP, and enter the address range:
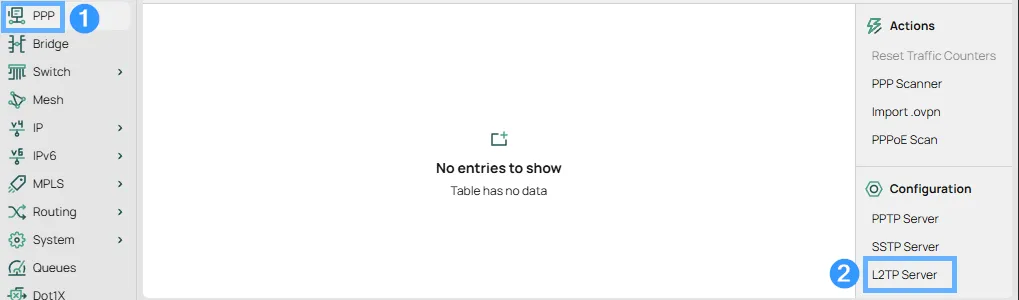
Go to PPP, then click L2TP Server in the Interface tab (or the side menu in WebFig). Enable the server and configure it as follows:
- Enabled: yes
- Default Profile: default-encryption
- Authentication: chap, mschap1, mschap2, pap
- Use IPsec: yes
- IPsec Secret: a strong shared secret of your choice (replace the example below)
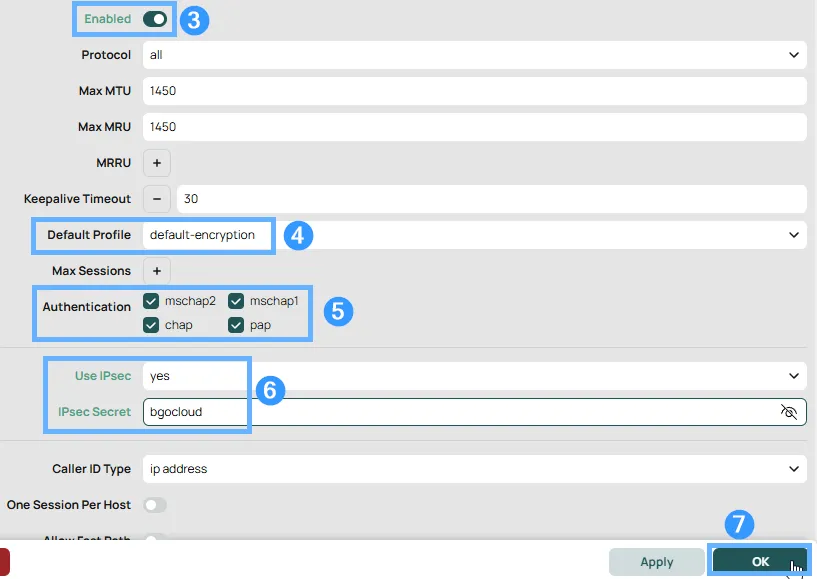
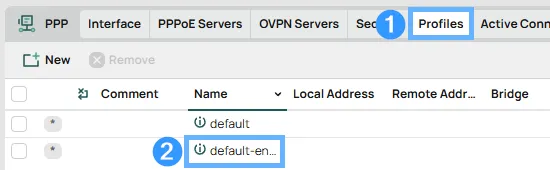
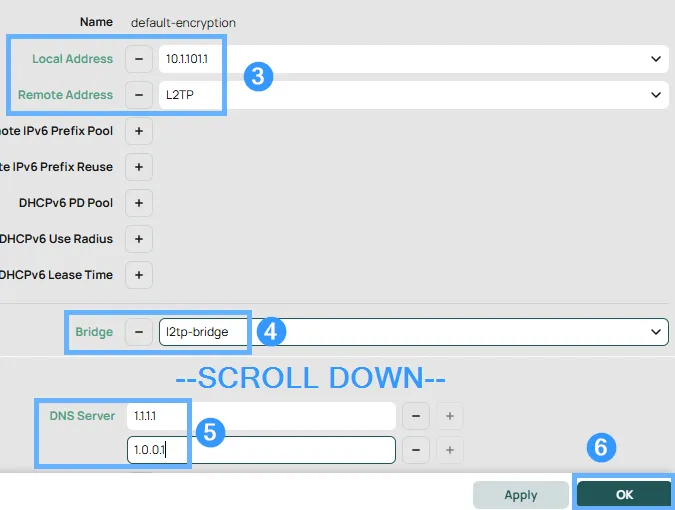
Rather than creating a new profile, we edit the built-in default-encryption profile to point it at our bridge and IP pool. Go to PPP > Profiles, double-click default-encryption, and set:
- Local Address:
10.1.101.1(the bridge IP from Step 2) - Remote Address:
L2TP(the pool from Step 3) - DNS Server:
1.1.1.1, 1.0.0.1(or your preferred servers) - Bridge:
l2tp-bridge
(Optional) Use the CHR itself as the DNS server for VPN clients
Instead of pointing clients at a public DNS like Cloudflare, you can forward DNS through your CHR. This unlocks a few useful features: you can create static DNS entries for internal hostnames, and you can use MikroTik's built-in Adlists feature to block ads and trackers network-wide for all VPN users.
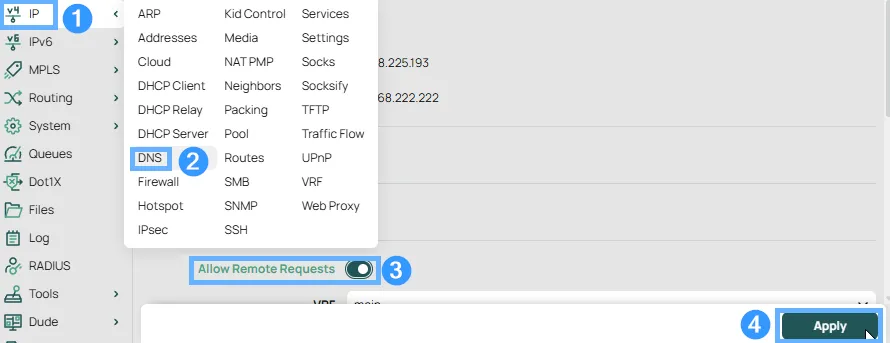
To do this, first enable DNS forwarding on the CHR. Go to IP > DNS and check Allow Remote Requests:
Then go back to the default-encryption profile and change the DNS Server field to 10.1.101.1 (the bridge address). To keep your CHR from being used as an open resolver from the internet, tighten the DNS firewall rule from our security guide so it only allows port 53 from your VPN subnet.
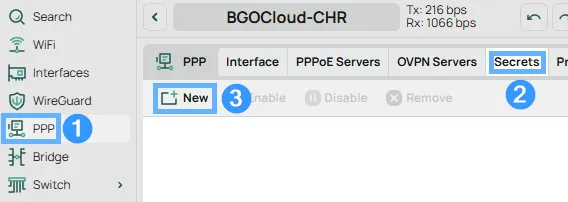
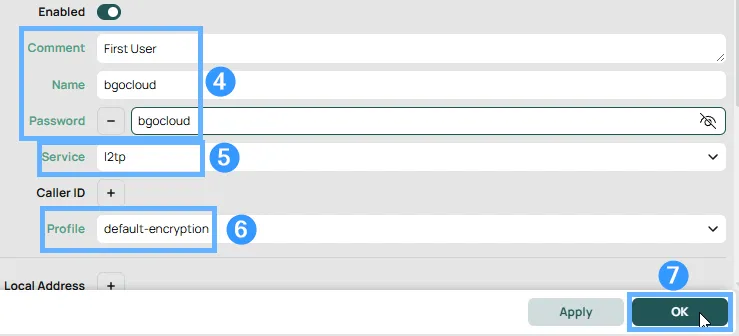
Go to PPP > Secrets, click New, and add your first VPN user. Set the service to l2tp to restrict this account to L2TP only, and make sure the profile is set to default-encryption. Use a strong, unique password — the example below is just a placeholder.
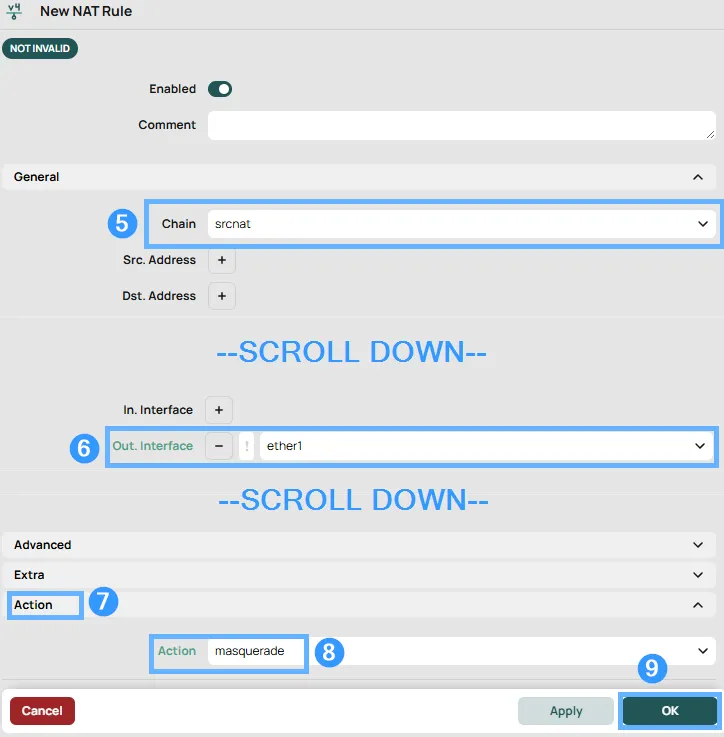
Without this rule, VPN clients will be able to reach the router but won't have outbound internet access. The masquerade rule rewrites the source address of traffic leaving through your WAN interface, making return traffic route back correctly.
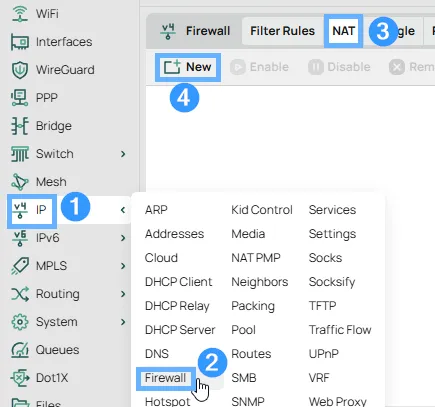
Go to IP > Firewall > NAT, click New, and set chain to srcnat, out-interface to ether1 (or whichever interface carries your WAN), and action to masquerade:
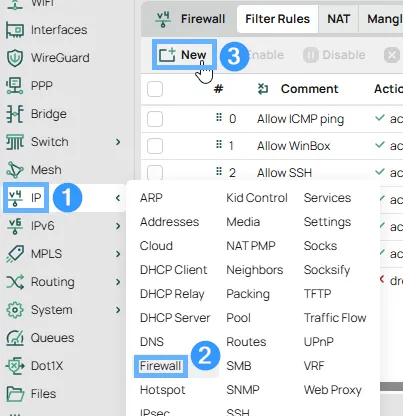
If your CHR uses a restrictive firewall (such as the one from our basic security guide), you need two explicit accept rules to let L2TP/IPsec traffic through. Without them, incoming VPN connections will be silently dropped.
Go to IP > Firewall > Filter Rules and add the following two rules:
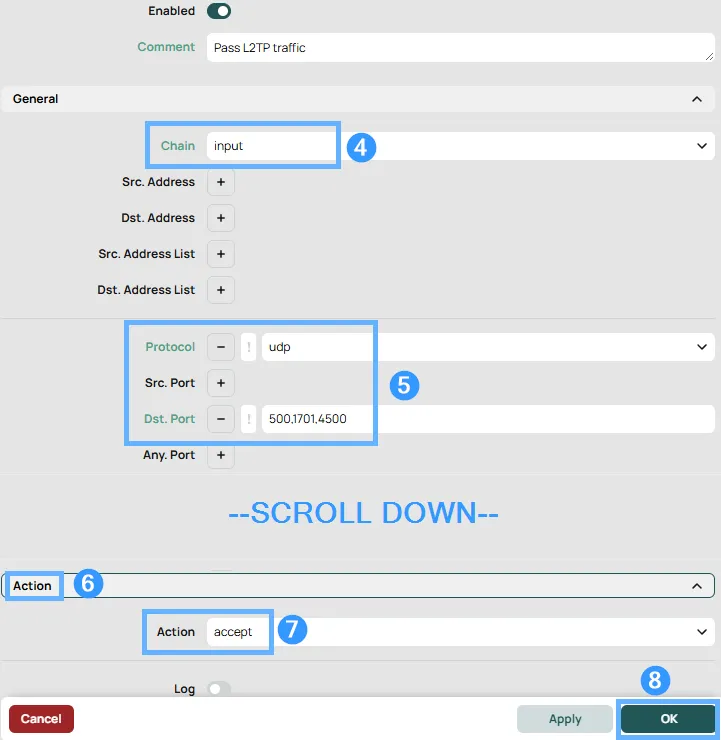
- Rule 1 — L2TP: chain
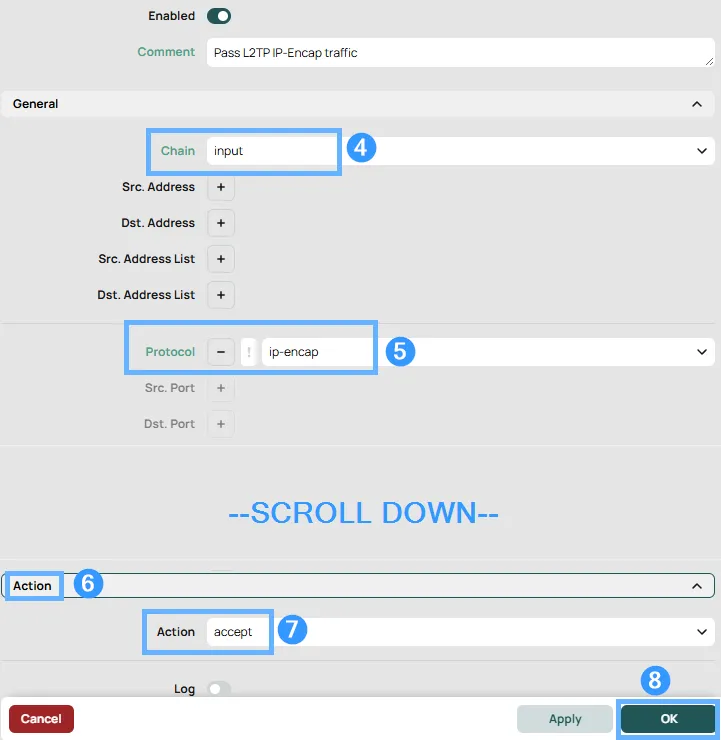
input, protocoludp, dst-port500,1701,4500, actionaccept - Rule 2 — IPsec encapsulation: chain
input, protocolipencap, actionaccept
Both new rules land at the bottom of the firewall list — below any drop rules, where they won't be reached. Drag them above the first blocking rule to make them active:
For CLI users, print all existing rules first to identify the drop rule number, then insert both accept rules above it using place-before. Replace X with that rule's number:
--- Firewall rules output ---
ip firewall filter add chain=input action=accept comment="IPSec Pass" protocol=ipencap place-before=X
ip firewall filter add chain=input action=accept comment="L2TP VPN" protocol=udp dst-port=500,1701,4500 place-before=X
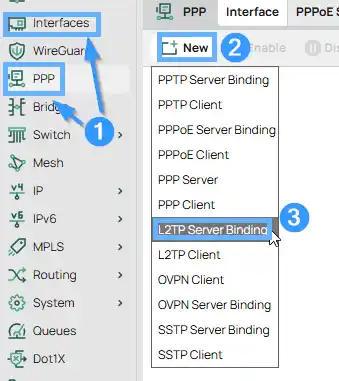
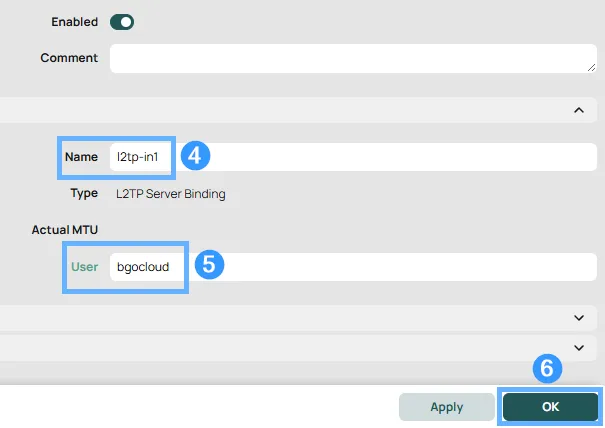
By default, each connected L2TP client gets a dynamically named interface. Interface bindings let you assign a fixed name to a specific user's connection, which makes it straightforward to reference that connection in firewall rules, apply per-user rate limits, or track their traffic over time.
Go to Interfaces, click New, choose L2TP Server Binding from the type list, give it a name, and set the User field to the PPP Secret username:
That's it — your MikroTik router is now running a fully functional L2TP/IPsec VPN server. Apple devices (iPhone, iPad, Mac) can connect using the built-in VPN client with no additional software required. The same setup works on both MikroTik CHR instances and physical RouterOS devices.
Connect your Apple devices and explore other VPN options:
Need a MikroTik CHR to run your VPN server on? BGOCloud's MikroTik VPS plans give you a fully licensed Cloud Hosted Router with a dedicated public IP, SSD-backed performance, and flexible traffic options — deployed in under a minute. Everything in this guide runs out of the box.